Understanding the FS Attributes API
Since Finsweet released attributes as open source I've been dipping in and out to understand how the API works and can be used effectively. Here's an explaination of the API methods and properties that I use pretty frequently to open more doors in my projects.
Vocab
Before we get stuck in. Let's all get on the same page on a few bits of vocab.
Object: if you don't know what this is then I promise you this is too advanced for you. I recommend you learn the datatypes of Javascript
Method: a function that's stored on an object
Module: An attribute solution (eg. 'list', 'copy', 'share')
Instance: A specific usage of that module on a given page.
Quick analogy to clarify the difference between Module and Instance
Think of a Honda Civic. The model “Honda Civic” represents the module — a general blueprint used across many vehicles. But your Honda Civic — the one in your driveway with your specific features and colours — is an instance of that module.
The FinsweetAttributes object
This is the top-level global object. Using this you'll be doing things like loading modules, running callbacks when an instance has loaded, destroying all the instances on the page.
Now lets get into some of the methods we can run on this object!
.push() will run a callback after the attribute has loaded.
1// This bit is just making sure that we've actually loaded the library before we start changing things
2window.FinsweetAttributes ||= [];
3
4// The .push function
5window.FinsweetAttributes.push([
6  // Once 'list' has loaded
7  'list',
8
9  // Run this callback
10  (result) => {
11    console.log('My filter, combine, nest and sort have all loaded!');
12  },
13]);
14
.push takes 2 arguments in the function.
- key: a string that corresponds to the attribute module you want to watch
- callback: the function you want to run when the function has loaded.
The 'list' that you pass through is a key for the relative attribute module. It corresponds to a FinsweetAttributeControls object. More on that later.
A list of keys can be found here:
https://github.com/finsweet/attributes/tree/master/packages
.load(key) will dynamically load an attribute solution.
So if you wanted to do a little manipulation to your CMS before loading CMS filter you do so like this:
1function editTheCMS() {
2  const items = Array.from(document.querySelectorAll('.cms-items'));
3
4  const filteredItems = items.filter(item => {
5    const keep = item.dataset.example !== "example";
6    if (!keep) item.remove();
7    return keep;
8  });
9
10  window.FinsweetAttributes.load('list');
11}
12In the example above we're getting our CMS items. Filtering some out then loading Finsweet dynamically with the new items.
.destroy() will destroy all the attributes on the page.
Honestly this one will be VERY useful to you if you've ever had to do AJAX or Barba.js. When you transition between pages, you'll want to destroy all the instances and reinitialise everything with the new page.
Note: This will remove EVERYTHING. If you need to remove specific instances then you'll need to use .restart() which is on the FinsweetAttributeControls object.
FinsweetAttributeControls
Each instance of a module is a FinsweetAttributeControls object. Meaning it has access to 2 properties and 2 methods.
Properties:
- Version: If you ever need to know which version of FS a client is using you can use this (you can also read the version number in the script tag 🤷♂️)
- Loading: This returns a promise. If you're unfamiliar with Promises don't worry. This really doesn't have that much use except for niche debugging from my experience.
Methods:
restart()— Destroys and reloads the instancedestroy()— You get the idea.
1// This bit is just making sure that we've actually loaded the library before we start changing things
2window.FinsweetAttributes ||= [];
3
4window.FinsweetAttributes.modules.list.restart();
5window.FinsweetAttributes.modules.list.destroy();That's it. It's a much more granular object than the main FinsweetAttributes, where you can programmatically handle individual instances.
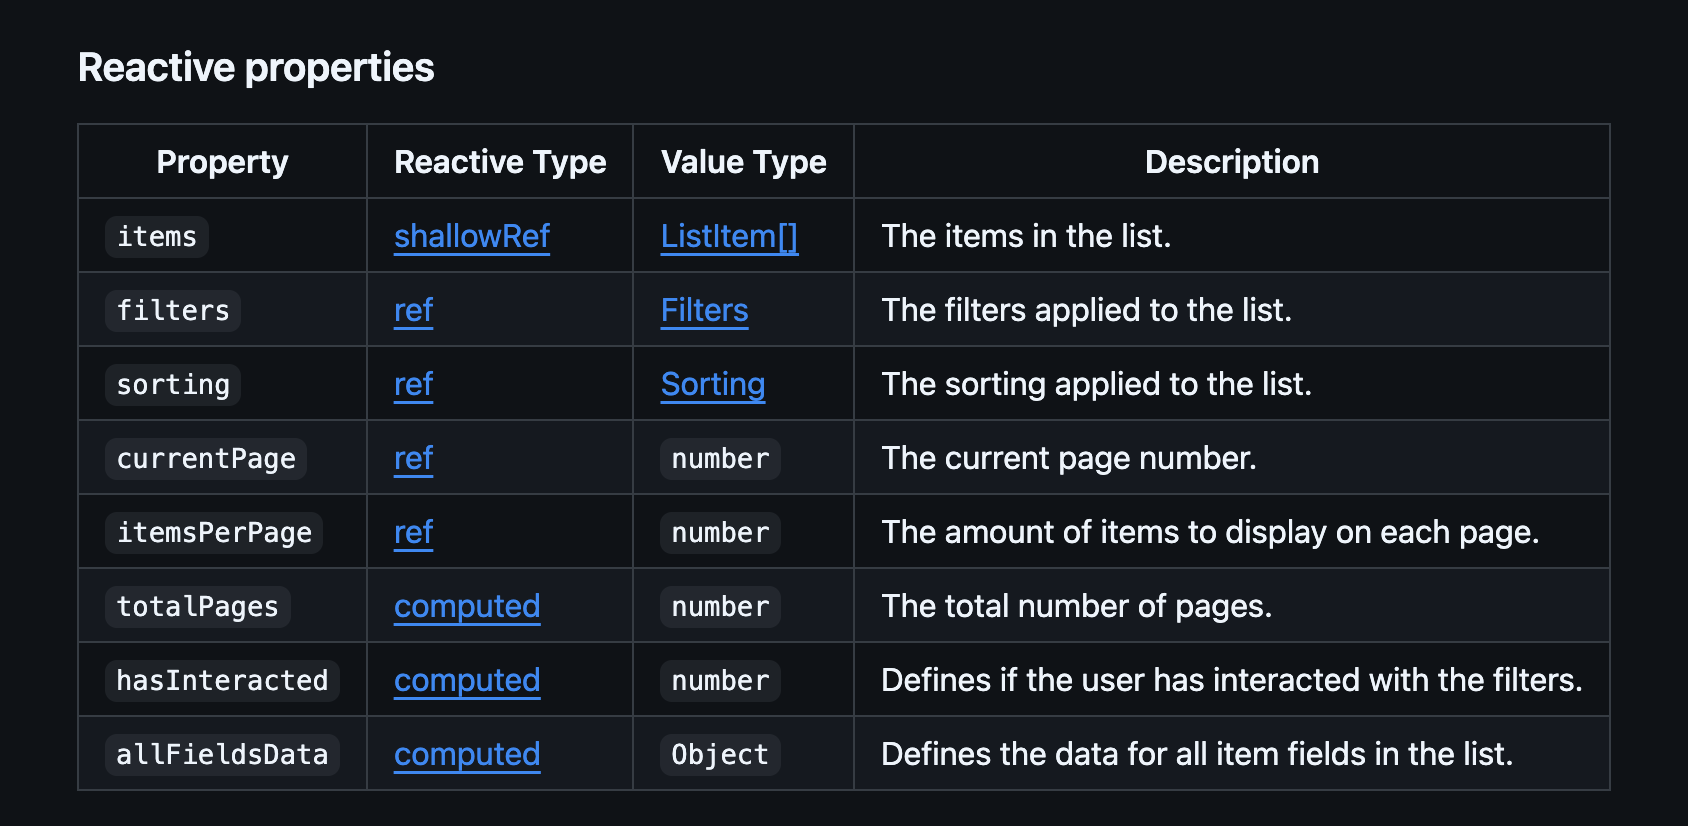
Reactivity
Now before we carry on. A quick point about 'reactivity'. I'll give you a very brief explainer on what reactivity is and what it means.
In short, reactivity lets you respond to changes in data. When a reactive property changes, your code can run something in response, automatically.
Finsweet uses Vue’s reactivity engine, which gives us two tools:
watch()→ respond to specific changeseffect()→ respond to any reactive value used inside a function
Don’t worry about the term “reactive type” (like ref, shallowRef, or computed) — just treat it as a black box for now. You don’t need to understand how the wiring works to drive the car.
Note: These methods live on the listInstance object — not on window.FinsweetAttributes, and not on the FinsweetAttributeControls object.
You only get access to listInstance inside the .push() callback.
1// This bit is just making sure that we've actually loaded the library before we start changing things
2window.FinsweetAttributes ||= [];
3
4// The .push function
5window.FinsweetAttributes.push([
6  'list',
7  (listInstance) => {
8    // All the code following would run in here.
9    // If there's many instances you'd need to loop over them and target them individually
10  },
11]);
12
1. watch() — Track specific source(s)
1// Call .watch on the specific list instance
2listInstance.watch(
3  // First argument returns the property we're watching
4  () => listInstance.items,
5
6  // Second argument is the callback that will run when a change occurs
7  (newItems, oldItems) => {
8    console.log('Items updated:', newItems, oldItems);
9  }
10);
11Purpose: Run a callback when the value of a specific reactive source changes.
.watch() takes 2 required arguments and 1 optional:
- Source — A callback function that returns the reactive property you want to watch.
- Callback — The function you want to run when the source changes
- Options — An optional set of options. Honestly, for 99% of Webflow developers, this is unnecessary. (But if you want to be in the top 1%, read this)
Useful when: You want to react to one or more specific properties, and need to compare the old value with the new.
2. effect() — Track all used dependencies automatically
1listInstance.effect(() => {
2 console.log('Total items:', listInstance.items.value.length);
3});Purpose: Run a function any time any reactive dependency it accesses changes.
It runs once, records the reactive values used inside the function, and re-runs if any of those values change.
Meaning: if you didn't use the property in the function at all, we’d never watch it. In the example, only if items.value.length changes will the callback fire.
But it has no access to the previous values.
So if you wanted to show in the UI "10 items -> 4 items" you'd need to use .watch().
Useful when: You want to run a function when any reactive property changes. Truthfully this will be the most applicable to Webflow developers. The syntax is easier, and you'll most likely be listening to changes in a CMS list like filtering, pagination, sorting etc… so you may as well use this.
Animated copy to clipboard button
I use this little snippet in almost every project. It's clean, simple and has lots of room for creativity.
How (and why) to add keyboard shortcuts to your Webflow site
A small keyboard shortcut can make a marketing site feel faster, more intentional, and “app-like” with almost no extra design or development
Useful GSAP utilities
A practical, code-heavy dive into GSAP’s utility functions—keyframes, pipe, clamp, normalize, and interpolate—and why they’re so much more than just shortcuts for animation math.
Using Functions as Property Values in GSAP (And Why You Probably Should)
GSAP lets you pass _functions_ as property values. I've known this for a while but never really explored it particularly deeply. Over the last couple of weeks I've been testing, experimenting and getting creative with it to deepen my understanding.
Organising JavaScript in Webflow: Exploring Scalable Patterns
Exploring ways to keep JavaScript modular and maintainable in Webflow — from Slater to GitHub to a custom window.functions pattern. A look at what’s worked (and what hasn’t) while building more scalable websites.